
This post contains affiliate links. This means I will make a commission at no extra cost to you should you click through and make a purchase [ “As an Amazon Associate, I earn from qualifying purchases.” ]. Read the full disclosure here.
2016 Honda Pilot Spark Plug Replacement GuideMechanic.Com Are you a proud owner of a 2016 Honda Pilot? If so, ensuring the smooth functioning of your vehicle is essential.
One crucial aspect that often gets overlooked is spark plug replacement. Spark plugs play a vital role in your car’s ignition system, and replacing them at regular intervals is necessary to maintain optimal performance.
In this comprehensive guide, we will walk you through the process of replacing spark plugs in your 2016 Honda Pilot, providing you with all the necessary information and steps to do it yourself.
Before we dive into the details, let’s understand why spark plug replacement is crucial. Spark plugs generate the electrical spark that ignites the air-fuel mixture in the combustion chamber, enabling your car to start and run smoothly.
Over time, spark plugs wear out or become fouled, resulting in reduced fuel efficiency, misfires, and even engine damage.
By replacing your spark plugs regularly, you can ensure efficient combustion, better fuel economy, and a longer lifespan for your Honda Pilot.
Understanding Spark Plugs and Their Lifespan
Spark plugs come in different types, each designed for specific engines and performance requirements. They are composed of several components, including the shell, insulator, electrode, and terminal.
Understanding these components will help you make informed decisions when it comes to choosing the right spark plugs for your Honda Pilot.
See Also: Honda Odyssey Spark Plug Replacement
Spark plugs have a finite lifespan and need replacement periodically. Various factors influence their longevity, such as the type of spark plug, driving conditions, and maintenance practices.
On average, most spark plugs last between 30,000 to 100,000 miles. However, it’s essential to consult your vehicle’s manual for the manufacturer’s recommended replacement interval.
Signs That Indicate Spark Plug Replacement:
- Difficulty starting the engine
- Reduced fuel efficiency
- Engine misfires or rough idling
- Loss of power and acceleration
- Inconsistent engine performance
Types of Spark Plugs
There are two primary types of spark plugs commonly used in vehicles – copper core plugs and platinum or iridium plugs. Copper core plugs are the traditional choice and offer excellent conductivity but have a shorter lifespan.
Platinum and iridium plugs, on the other hand, provide better performance and durability, making them a popular choice for modern vehicles like the 2016 Honda Pilot.
Summary: Understanding the components of spark plugs, their lifespan, and the signs indicating replacement will help you make informed decisions and maintain optimal performance in your Honda Pilot.
Gathering the Necessary Tools and Materials
Before you begin the spark plug replacement process, it’s crucial to gather all the required tools and materials. Here’s a comprehensive list to ensure you have everything you need:
Tools:
- Ratchet wrench
- Spark plug socket
- Extension bar
- Spark plug gap gauge
- Torque wrench
- Socket wrench set
- Spark plug wire puller (if applicable)
- Anti-seize compound (recommended)
Materials:
- New spark plugs (compatible with your Honda Pilot)
- Dielectric grease
- Shop towel or rag
- Silicone dielectric compound (optional)
- Penetrating oil (if necessary)
Having these tools and materials readily available will ensure a smooth spark plug replacement process without any interruptions.
Summary: Gathering the necessary tools and materials beforehand saves time and ensures a hassle-free spark plug replacement experience.
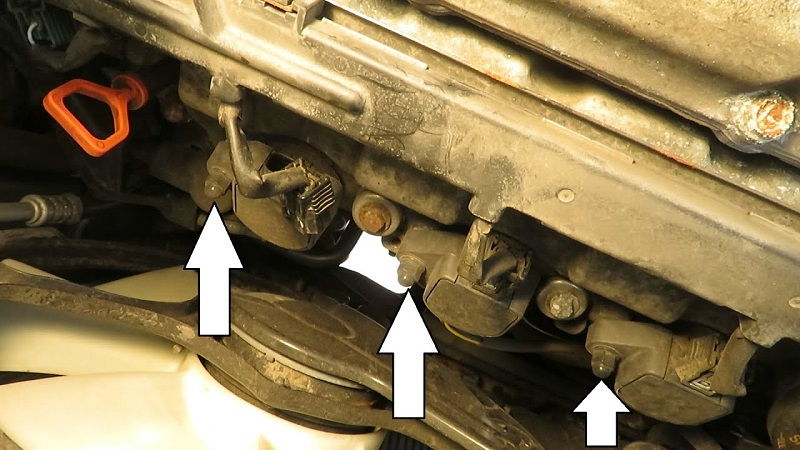
Locating the Spark Plugs in Your Honda Pilot
Locating the spark plugs in your Honda Pilot is the first step towards replacing them. The spark plugs are typically located on the engine’s cylinder head, and accessing them may require removing certain components. Here’s a step-by-step guide to help you locate the spark plugs:
Step 1: Prepare Your Vehicle
Park your Honda Pilot on a flat surface and engage the parking brake. Open the hood and let the engine cool down before proceeding.
Step 2: Locate the Engine
Identify the engine compartment by locating the large metal cover that houses the engine. This cover is often labeled with the Honda logo.
Step 3: Remove the Engine Cover
Depending on the model year and engine type, removing the engine cover may be necessary to access the spark plugs. Refer to your vehicle’s manual or consult online resources for specific instructions on removing the engine cover.
Step 4: Identify the Cylinder Head
Once the engine cover is removed, locate the cylinder head. The cylinder head is a metal component positioned at the top of the engine block and has various components attached to it.
Step 5: Spot the Spark Plug Wires
Look for a series of thick wires connected to the top of the cylinder head. These wires are the spark plug wires, and they lead directly to the spark plugs. Trace the wires to find their connection points on the cylinder head.
Step 6: Identify the Spark Plugs
At the end of each spark plug wire, you will find the spark plugs. Depending on your engine’s configuration, you may have multiple spark plugs arranged in a specific pattern.
See Also: Spark Plug Service: DIY or Professional?
Summary: Familiarizing yourself with the location of the spark plugs in your Honda Pilot is essential before proceeding with the replacement process. Follow our step-by-step guide to identify the spark plugs and their connection points.
Removing the Old Spark Plugs
Once you have located the spark plugs, it’s time to remove the old ones. Follow these steps to safely remove the old spark plugs from your 2016 Honda Pilot:
Step 1: Prepare the Area
Before removing the spark plugs, clean the area around them to prevent debris from falling into the cylinder head when the plugs are removed.
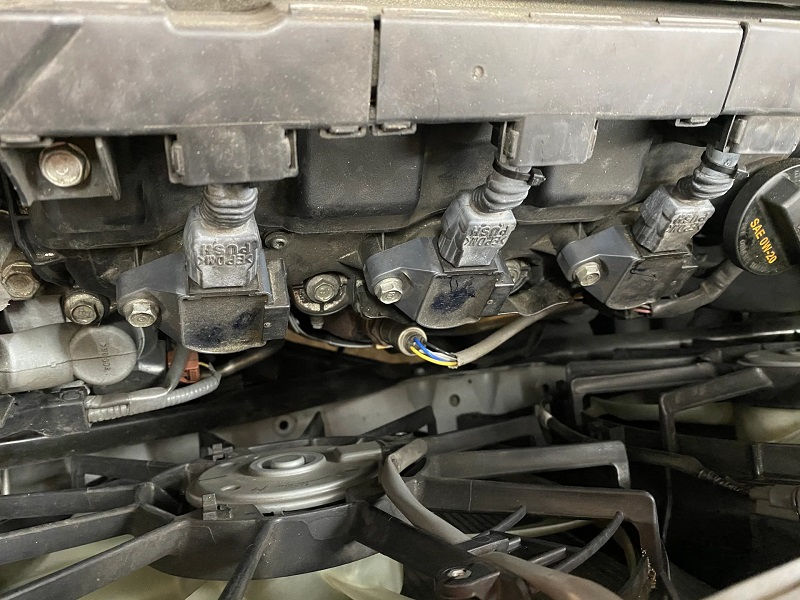
Step 2: Disconnect the Spark Plug Wires
Carefully disconnect each spark plug wire from its corresponding spark plug. If your Honda Pilot has individual coil-on-plug ignition, you may need to remove the ignition coils to access the spark plugs.
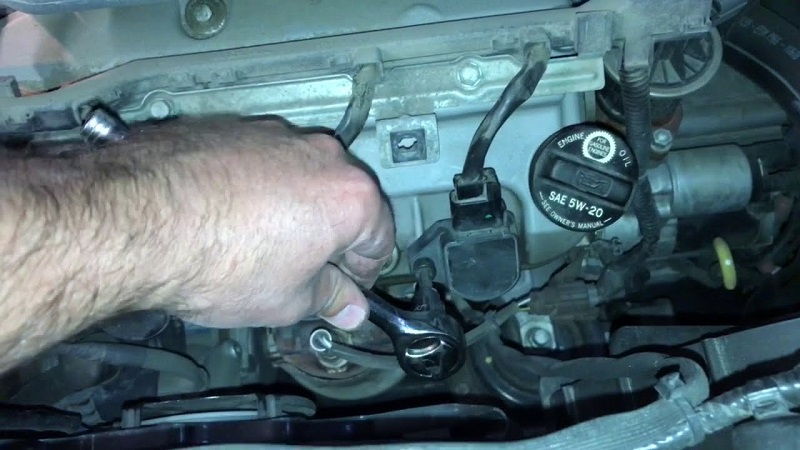
Step 3: Remove the Old Spark Plugs
Using a spark plug socket attached to a ratchet wrench, loosen and remove each spark plug by turning it counterclockwise. Be cautious not to force or damage the spark plugs during removal.
Step 4: Inspect the Old Spark Plugs
Examine the removed spark plugs for signs of wear, damage, or fouling. Pay attention to any oil or carbon deposits, as these can indicate underlying engine issues that may require further inspection.
Step 5: Set Spark Plug Gap for New Plugs
If your new spark plugs are not pre-gapped, you will need to adjust the electrode gap to the manufacturer’s specifications. Use a spark plug gap gauge to measure the gap and gently adjust it if necessary.
Summary: Removing the old spark plugs requires caution and attention to detail. Follow these steps to safely remove the old spark plugs without causing any damage.
Inspecting and Cleaning the Spark Plug Wells
While the spark plugs are out, it’s an ideal time to inspect and clean the spark plug wells. The spark plug wells are the recessed areas where the spark plugs are inserted. Here’s how to inspect and clean the spark plug wells:
Step 1: Inspect for Damage or Debris
Using a flashlight, visually inspect the spark plug wells for any signs of damage, such as cracks or corrosion. Additionally, check for debris or foreign objects that may have entered the wells.
Step 2: Clean the Wells
If you notice any dirt or debris in the spark plug wells, use compressed air or a small vacuum cleaner to remove it. Be gentle to avoid dislodging any loose debris into the cylinder head.
Step 3: Check for Oil or Moisture
Inspect the spark plug wells for any signs of oil or moisture, as these can indicate gasket or seal leaks. If you notice oil or moisture, it’s advisable to consult a professional mechanic for further inspection and repairs.
See Also: Briggs and Stratton Spark Plug Replacement
Summary: Inspecting and cleaning the spark plug wells ensures a clean and debris-free environment for the new spark plugs. Check for damage, clean any debris, and address any oil or moisture issues as necessary.
Installing the New Spark Plugs
With the old spark plugs removed and the wells cleaned, it’s time to install the new spark plugs. Follow these steps to correctly install the new spark plugs in your Honda Pilot:
Step 1: Apply Anti-Seize Compound (Optional)
Before installing the new spark plugs, you may choose to apply a thin layer of anti-seize compound to the threads. This will help prevent the spark plugs from seizing or becoming difficult to remove in the future. Be careful not to get any compound on the electrode or insulator.
Step 2: Insert the New Spark Plugs
Take one of the new spark plugs and carefully insert it into the spark plug socket. Begin threading the spark plug into the spark plug well by hand. Ensure you’re turning it clockwise to avoid cross-threading.
Once you’ve hand-tightened the spark plug, use a torque wrench and spark plug socket to tighten it according to the manufacturer’s specifications. Avoid over-tightening, as this can damage the spark plug or cylinder head.
Step 3: Repeat for Remaining Spark Plugs
Repeat the installation process for each of the remaining spark plugs. Take your time and ensure each spark plug is properly seated and tightened to the correct torque specification.
Step 4: Reconnect Spark Plug Wires
Once all the new spark plugs are installed, reattach the spark plug wires or ignition coils. Ensure each wire is securely connected to the corresponding spark plug. If your Honda Pilot has individual coil-on-plug ignition, make sure the ignition coils are properly seated.
Summary: Installing the new spark plugs requires careful threading, proper torque, and secure connections. Follow these steps to ensure the new spark plugs are correctly installed in your Honda Pilot.
Reassembling the Components
After successfully installing the new spark plugs, it’s crucial to reassemble the components you removed or disconnected earlier. Follow these steps to ensure a proper reassembly:
Step 1: Reinstall the Engine Cover
If you removed the engine cover, carefully place it back in its original position. Ensure it is properly aligned and securely fastened according to the manufacturer’s instructions.
Step 2: Reconnect Any Disconnected Components
If you disconnected any components, such as ignition coils or other wiring, make sure to reconnect them securely. Double-check that all connections are tight and in the correct order.
Step 3: Dispose of Old Spark Plugs
Properly dispose of the old spark plugs in accordance with local regulations. Most auto parts stores offer recycling programs for used spark plugs.
Summary: Reassembling the components ensures that everything is properly secured and in its rightful place. Take your time to ensure a complete and precise reassembly of all components.
Testing the New Spark Plugs
Once you’ve completed the spark plug replacement process, it’s essential to test the new spark plugs to verify their performance. Here’s how you can test the newly installed spark plugs:
Step 1: Start the Engine
Start your Honda Pilot’s engine and allow it to idle for a few minutes. Observe the engine’s behavior and listen for any irregular sounds or vibrations.
Step 2: Check for Smooth Idle
While the engine is idling, ensure that it maintains a smooth and steady idle. If you notice any roughness or fluctuation in the engine’s idle speed, there may be an issue with the spark plugs or other components that require further inspection.
Step 3: Test Acceleration and Performance
Take your Honda Pilot for a test drive and pay attention to its acceleration and overall performance. If you experience any hesitation, misfires, or a noticeable drop in power, it may indicate a problem with the new spark plugs.
Step 4: Monitor Fuel Efficiency
Over the next few days of driving, keep an eye on your Honda Pilot’s fuel efficiency. If you notice a significant decrease in fuel economy, it could be a sign of spark plug issues or other underlying problems.
See Also: 2003 Honda Accord Spark Plugs
Summary: Testing the new spark plugs ensures that they are functioning correctly and contributing to the optimal performance of your Honda Pilot. Monitor the engine’s behavior, acceleration, fuel efficiency, and overall performance to ensure everything is working as expected.
Spark Plug Replacement Frequency for Future Maintenance
Knowing when to replace spark plugs in the future is essential for maintaining your Honda Pilot’s performance and preventing potential issues.
While the 2016 Honda Pilot’s recommended spark plug replacement interval is typically around 100,000 miles, it’s important to consult your vehicle’s manual for the manufacturer’s specific recommendations.
However, keep in mind that certain driving conditions or factors, such as frequent short trips, stop-and-go traffic, or harsh climates, may require more frequent spark plug replacements.
Additionally, if you notice any signs of spark plug wear or performance issues, it’s advisable to have them inspected and replaced as needed, regardless of the recommended interval.
Summary: Understanding the recommended spark plug replacement frequency and being aware of driving conditions or signs of wear will help you maintain your Honda Pilot’s performance and prevent potential problems in the future.
Benefits of Regular Spark Plug Replacement
Regularly replacing your spark plugs offers numerous benefits for your 2016 Honda Pilot’s performance and longevity. Here are some key advantages:
Improved Fuel Efficiency
By ensuring efficient combustion, properly functioning spark plugs contribute to better fuel economy. Regular spark plug replacement helps maintain optimal fuel efficiency, saving you money at the pump in the long run.
Enhanced Engine Performance
Faulty or worn-out spark plugs can lead to misfires, rough idling, and a decrease in overall engine performance. By replacing the spark plugs, you can restore smooth operation, improve acceleration, and enjoy a more responsive engine.
Reliable Ignition System
Spark plugs are a critical component of your Honda Pilot’s ignition system. By replacing them regularly, you ensure a reliable ignition process, reducing the risk of starting issues or engine stalls.
Longer Engine Lifespan
Properly functioning spark plugs contribute to efficient combustion and reduced stress on the engine. By replacing them on time, you can help extend the overall lifespan of your Honda Pilot’s engine.
Summary: Regularly replacing your spark plugs offers a range of benefits, including improved fuel efficiency, enhanced engine performance, a reliable ignition system, and a longer lifespan for your Honda Pilot’s engine.
Now that you are equipped with a comprehensive guide on replacing the spark plugs in your 2016 Honda Pilot, you can confidently take on this maintenance task.
By following the step-by-step instructions, understanding the importance of spark plug replacement, and reaping the benefits of a well-maintained ignition system, you can ensure optimal performance, fuel efficiency, and longevity for your beloved Honda Pilot.
Remember, regular spark plug replacement is a small effort that goes a long way in maintaining the reliability of your vehicle.
Keep in mind that if you ever feel unsure or uncomfortable with the process, it’s always recommended to consult a professional mechanic to ensure the job is done correctly. Happy spark plug replacing!
Related video of 2016 Honda Pilot Spark Plug Replacement: A Comprehensive Guide

- P007F 62 Code Range Rover - June 10, 2024
- P007F Ford Focus: Causes, Diagnosis, and Solutions - June 5, 2024
- P0080 Ford: Causes, Diagnosis, and Solutions - May 31, 2024