
This post contains affiliate links. This means I will make a commission at no extra cost to you should you click through and make a purchase [ “As an Amazon Associate, I earn from qualifying purchases.” ]. Read the full disclosure here.
2011 Chevy Malibu Fuel Pump GuideMechanic.Com Are you facing issues with the fuel pump of your 2011 Chevy Malibu? Look no further, as this blog article aims to provide you with a detailed and comprehensive guide to understanding and troubleshooting the fuel pump in your vehicle.
Whether you are experiencing fuel delivery problems or simply want to learn more about this essential component, this article will equip you with the knowledge you need to keep your Malibu running smoothly.
In this guide, we will explore the various aspects of the 2011 Chevy Malibu fuel pump, including its function, common signs of a failing pump, troubleshooting techniques, and maintenance tips.
See Also: Chevy Cruze Catalytic Converter
By the end of this article, you will have a thorough understanding of how the fuel pump works and be able to identify and address any issues that may arise.
Understanding the Fuel Pump: How It Works
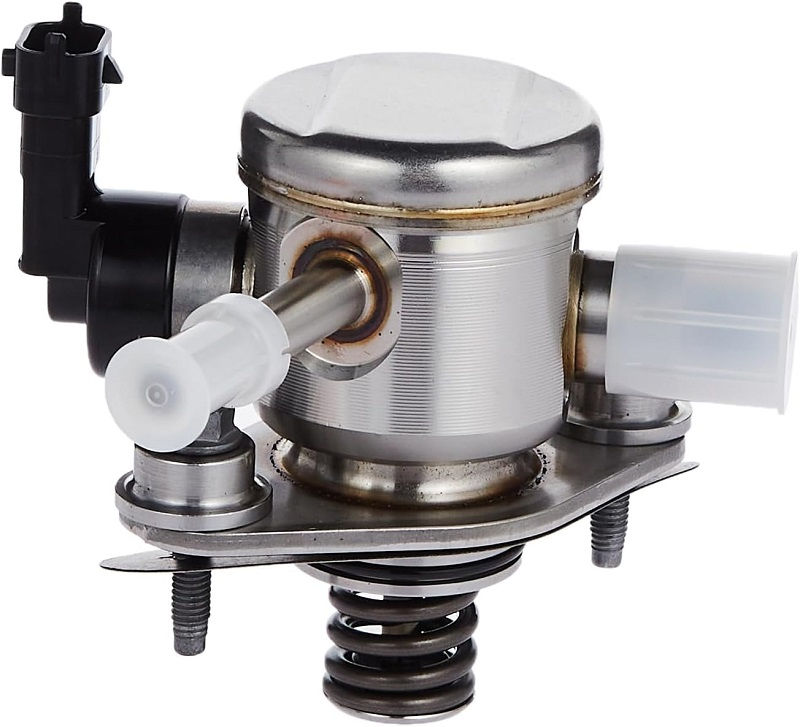
Check out this GM Genuine Parts EP1028 High Pressure Fuel Pump with Seal, Retainer, Gasket, and Bolt
In order to effectively troubleshoot and maintain the fuel pump in your 2011 Chevy Malibu, it is crucial to understand how this vital component works.
The fuel pump plays a pivotal role in delivering fuel from the gas tank to the engine, ensuring that the vehicle has a consistent and reliable fuel supply.
By exploring the inner workings of the fuel pump, we can gain insight into its function and how it contributes to the overall performance of the Malibu.
The Function of the Fuel Pump
At its core, the fuel pump is responsible for drawing fuel from the gas tank and delivering it to the engine at the correct pressure.
It accomplishes this task by utilizing a combination of mechanical and electrical components. Within the fuel tank, the pump is submerged in fuel, allowing it to cool and lubricate its internal parts.
When the engine is running, the fuel pump is activated by an electrical signal, which initiates the pumping action.
As fuel is drawn in, it is pressurized and sent through the fuel lines to the engine, where it is utilized for combustion.
Types of Fuel Pumps Used in the 2011 Chevy Malibu
The 2011 Chevy Malibu is equipped with different types of fuel pumps, depending on the specific model and engine configuration.
The two primary types of fuel pumps used in the Malibu are the mechanical fuel pump and the electric fuel pump.
Understanding the differences between these pumps can provide valuable insights when troubleshooting and maintaining your vehicle.
The mechanical fuel pump, as the name suggests, is driven by the engine’s mechanical motion. It utilizes a camshaft or pushrod to generate the necessary pumping action.
This type of fuel pump is commonly found in older vehicles but is less prevalent in modern cars like the 2011 Malibu. However, it is important to be aware of its existence, especially if you own an older model.
The electric fuel pump, on the other hand, is the more common type found in the 2011 Chevy Malibu. It operates using an electric motor and is typically located inside the fuel tank.
The electric fuel pump offers several advantages over its mechanical counterpart, including greater fuel pressure control, quieter operation, and improved efficiency.
Understanding the specific characteristics and components of the electric fuel pump can significantly aid in diagnosing and addressing any issues that may arise.
See Also: Chevy Cruze Mass Air Flow Sensor
Signs of a Failing Fuel Pump: What to Look Out For
Recognizing the signs of a failing fuel pump is crucial for early detection and prevention of major issues. The fuel pump is a critical component of the vehicle’s fuel delivery system, and any malfunction can lead to poor engine performance and even complete engine failure.
By familiarizing yourself with the common symptoms of a failing fuel pump, you can take prompt action to address the issue and avoid further damage to your 2011 Chevy Malibu.
Engine Misfires and Stalling
One of the most noticeable signs of a failing fuel pump is engine misfires and stalling. When the fuel pump is not functioning correctly, it may not be able to deliver the required amount of fuel to the engine consistently.
This can result in an inadequate fuel-air mixture, leading to misfires or the engine stalling altogether. If you notice your engine hesitating, sputtering, or completely shutting off while driving, it is essential to consider the fuel pump as a potential culprit.
Decreased Fuel Efficiency
A failing fuel pump can also have a significant impact on your vehicle’s fuel efficiency. If the pump is not delivering fuel at the proper pressure, the engine may struggle to operate efficiently.
This can result in a decrease in gas mileage, requiring you to refill your tank more frequently. If you notice a sudden drop in fuel efficiency without any other apparent causes, such as changes in driving conditions or tire pressure, it may be indicative of a failing fuel pump.
Difficulty Starting the Engine
Another common sign of a failing fuel pump is difficulty starting the engine. When the fuel pump is malfunctioning, it may struggle to supply the engine with the necessary fuel during startup.
This can lead to extended cranking times or even the engine failing to start altogether. If you find yourself experiencing frequent issues with starting your 2011 Chevy Malibu, it is worth investigating the fuel pump as a potential source of the problem.
Whining or Buzzing Noises
Unusual noises coming from the fuel tank area, such as whining or buzzing sounds, can be indicative of a failing fuel pump.
As the pump wears out or encounters issues, it may begin to produce abnormal sounds during operation. These noises can vary in intensity and may be more noticeable when the fuel tank is low.
If you hear any unusual sounds emanating from your Malibu while driving or when the engine is running, it is advisable to have the fuel pump inspected.
Check Engine Light
While the check engine light can be triggered by a wide range of issues, it can also indicate a problem with the fuel pump.
Modern vehicles, including the 2011 Chevy Malibu, are equipped with sophisticated onboard diagnostic systems that monitor various components and systems.
If the fuel pump is not functioning optimally, it may trigger a fault code, leading to the illumination of the check engine light on your dashboard.
See Also: 2015 Chevy Cruze Water Pump
If your check engine light is on, it is essential to have your vehicle diagnosed by a qualified mechanic to determine the exact cause.
Diagnosing Fuel Pump Problems: Step-by-Step Guide
When faced with fuel pump issues, it is important to diagnose the problem accurately to implement the appropriate solutions.
While fuel pump problems can be frustrating, having a systematic approach to troubleshooting can simplify the process and save time and money.
In this section, we will provide you with a step-by-step guide to diagnosing fuel pump problems in your 2011 Chevy Malibu, equipping you with the knowledge and techniques required to identify and address any issues that may arise.
Step 1: Perform a Visual Inspection
The first step in diagnosing fuel pump problems is to perform a visual inspection of the fuel pump and its surrounding components.
Start by locating the fuel pump, which is typically located inside the fuel tank in the 2011 Chevy Malibu. Inspect the fuel lines, connectors, and electrical connections for any signs of damage, leaks, or loose connections.
Additionally, check for any accumulation of dirt or debris around the fuel pump, as this can impede its proper functioning.
Step 2: Check Fuel Pressure
One of the most effective ways to diagnose fuel pump issues is to check the fuel pressure. A fuel pressure gauge is required for this step, which can be rented or purchased from an auto parts store.
To perform a fuel pressure test, locate the fuel pressure test port on the fuel rail of your Malibu’s engine. Connect the fuel pressure gauge to the test port and turn the ignition key to the “On” position without starting the engine.
The fuel pressure reading should match the specifications provided by the manufacturer. If the pressure is significantly lower than the recommended range, it may indicate a failing fuel pump.
Step 3: Test the Fuel Pump Relay
The fuel pump relay is an essential component that controls the electrical supply to the fuel pump. A malfunctioning relay can result in the fuel pump not receiving power, leading to fuel delivery issues.
To test the fuel pump relay, consult your vehicle’s manual to locate the relay’s position in the fuse box or relay center.
Once located, you can perform a simple test by swapping the fuel pump relay with a similar relay in the same box, such as the horn or A/C relay.
If the fuel pump starts functioning properly after swapping the relay, it is likely that the original relay was faulty and needs to be replaced.
Step 4: Listen for Fuel Pump Operation
Another method of diagnosing fuel pump issues is by listening for its operation. When you turn the ignition key to the “On” position without starting the engine, you should be able to hear a brief buzzing or humming sound from the fuel tank area.
This sound indicates that the fuel pump is receiving power and functioning correctly. If you do not hear any noise or notice an unusual sound, it may suggest a problem with the fuel pump motor or electrical connections.
Step 5: Check Fuel Pump Voltage
Testing the voltage supply to the fuel pump can help identify electrical issues that may be affecting its performance.
Using a multimeter set to the appropriate voltage range, carefully probe the electrical connectors associated with the fuel pump while the ignition key is turned to the “On” position.
The multimeter should display a voltage reading within the specified range for your vehicle. If the voltage reading is significantly lower or higher than the recommended range, it may indicate a problem with the fuel pump’s electrical supply.
In such cases, further inspection of the wiring and connectors is necessary to pinpoint the exact cause of the issue.
Step 6: Perform a Fuel Pump Flow Test
In some cases, a fuel pump may still function but not deliver fuel at the correct flow rate, leading to engine performance issues.
See Also: 2014 Chevy Cruze Coil Pack
To perform a fuel pump flow test, you will need a fuel pressure gauge and a container to collect the fuel. Begin by disconnecting the fuel line from the fuel rail and attaching the pressure gauge to the line.
Place the other end of the fuel line into the container and turn the ignition key to the “On” position. This will activate the fuel pump, and you should observe fuel flowing into the container.
Compare the flow rate to the specifications provided by the manufacturer. If the flow rate is significantly lower than recommended, it may indicate a problem with the fuel pump or fuel filter, requiring further inspection and potential replacement.
Step 7: Consult a Professional Mechanic
If you have performed the above steps and are still unable to identify the cause of your fuel pump issues, it may be necessary to consult a professional mechanic.
A qualified technician will have the expertise and specialized equipment to diagnose and repair complex fuel pump problems.
They can perform advanced tests, such as a fuel pump pressure test or an electrical analysis, to accurately pinpoint the issue and recommend the appropriate course of action.
Seeking professional help is especially important if you are unfamiliar with automotive electrical systems or lack the necessary tools for comprehensive diagnosis.
Fuel Pump Replacement: A DIY Approach
For those inclined to tackle the fuel pump replacement themselves, this section will provide a detailed walkthrough of the process.
Although replacing a fuel pump can be a challenging task, with the right tools, knowledge, and precautions, it can be accomplished successfully.
Performing a DIY fuel pump replacement can save you money on labor costs and give you a sense of accomplishment.
However, it is essential to note that working with fuel systems can be dangerous, so it is crucial to prioritize safety and exercise caution throughout the process.
Tools and Materials Required
Before beginning the fuel pump replacement process, gather the necessary tools and materials to ensure a smooth and efficient DIY experience.
The specific tools required may vary depending on your vehicle and the fuel pump replacement kit you choose. However, some common tools and materials typically needed for a fuel pump replacement include:
- Socket and wrench set
- Fuel line disconnect tool
- Fuel pressure gauge
- Fuel pump replacement kit
- New fuel filter
- New fuel tank seal or gasket
- Shop towels or rags
- Fuel container
- Fire extinguisher (for safety)
Step-by-Step Fuel Pump Replacement Guide
It is essential to consult your vehicle’s manual for specific instructions and precautions before attempting a fuel pump replacement. The following steps provide a general guide for replacing the fuel pump in a 2011 Chevy Malibu:
Step 1: Prepare the Vehicle
Ensure your vehicle is parked on a flat, level surface and engage the parking brake. Disconnect the negative terminal of the battery to prevent any electrical mishaps during the replacement process.
To relieve any residual fuel pressure, remove the fuel pump fuse or relay and start the engine. Allow the engine to run until it stalls, indicating that the fuel lines are depressurized. Turn off the ignition and disconnect any electrical connections related to the fuel pump.
Step 2: Access the Fuel Pump
Locate the access point for the fuel pump. In most cases, this will involve removing the rear seat or accessing the fuel pump through the trunk of the vehicle. Follow the specific instructions provided in your vehicle’s manual to gain access to the fuel pump module.
Step 3: Remove the Fuel Pump Module
Once you have gained access to the fuel pump module, carefully disconnect the electrical connectors and fuel lines connected to the module.
Take note of the connections and their locations to ensure proper reinstallation. Use the appropriate tools to disconnect any retaining clips or fasteners securing the fuel pump module in place. Carefully lift the module out of the fuel tank, taking care not to damage any components or spill fuel.
Step 4: Replace the Fuel Pump
With the old fuel pump module removed, it is time to install the new fuel pump. Follow the instructions provided with the replacement kit to ensure proper installation.
Take note of any seals or gaskets that need to be replaced and ensure they are properly positioned. Carefully lower the new fuel pump module into the fuel tank, aligning it with the mounting points. Reattach any retaining clips or fasteners and reconnect the electrical connectors and fuel lines.
Step 5: Reassemble and Test
With the new fuel pump installed, reassemble any components that were removed to access the fuel pump module.
Double-check all connections and ensure they are secure. Reinstall the fuel pump fuse or relay and reconnect the negative terminal of the battery.
See Also: 2011 Chevy Cruze Thermostat
Before starting the engine, turn the ignition key to the “On” position for a few seconds to pressurize the fuel system. Check for any fuel leaks around the fuel pump and connections.
Once satisfied, start the engine and listen for any abnormal noises or issues. Monitor the fuel pressure gauge, if available, to ensure it falls within the recommended range.

- Vegan Food Trucks for Sale by Owner - July 12, 2025
- Ice Cream Food Trucks for Sale - July 11, 2025
- Breakfast Food Trucks for Sale - July 11, 2025