
This post contains affiliate links. This means I will make a commission at no extra cost to you should you click through and make a purchase [ “As an Amazon Associate, I earn from qualifying purchases.” ]. Read the full disclosure here.
Mini Cooper Warning Lights GuideMechanic.Com Mini Coopers are renowned for their sleek design and fun driving experience. However, just like any other vehicle, they come equipped with warning lights that indicate potential issues.
To ensure you can address these concerns promptly, it’s crucial to understand what each warning light signifies and take appropriate action. In this blog article, we will provide a detailed and comprehensive guide to Mini Cooper warning lights.
In the following sections, we will discuss the meaning of each warning light, its possible causes, and the recommended steps to resolve the issue.
Whether you are a new Mini Cooper owner or have been driving one for years, this guide will help you navigate through the maze of warning lights effectively, keeping your beloved car in top condition.
Mini Cooper Warning Lights: Engine Warning Light
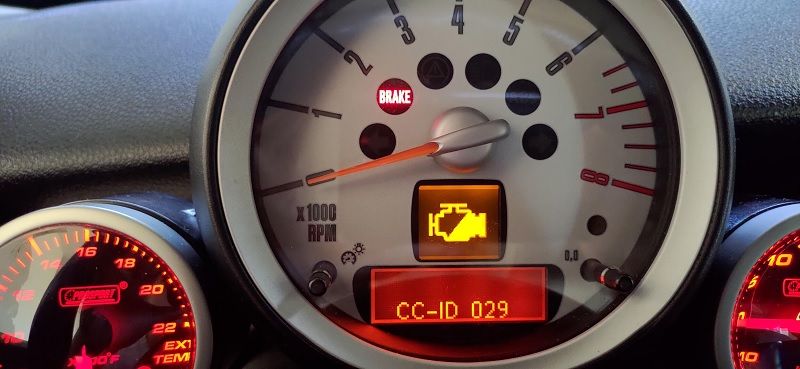
The engine warning light, also known as the check engine light, is one of the most important warning lights in your Mini Cooper.
When this light illuminates, it indicates that the engine management system has detected a potential issue. The possible causes for this warning light vary, ranging from a loose gas cap to a faulty oxygen sensor or a more serious engine problem.
See Also: P0441 Bmw E46: Trouble Shooting
Possible Causes
1. Loose Gas Cap: A loose or improperly tightened gas cap can trigger the engine warning light. This issue is relatively easy to fix. Simply ensure that the gas cap is securely tightened.
2. Faulty Oxygen Sensor: The oxygen sensor measures the amount of oxygen in the exhaust gases. A malfunctioning oxygen sensor can affect the engine’s performance and fuel efficiency. It is recommended to have the sensor diagnosed and replaced if necessary.
3. Ignition System Problem: Issues with the ignition system, such as a faulty spark plug or ignition coil, can trigger the engine warning light. A diagnostic scan will help identify the specific problem.
4. Catalytic Converter Failure: A failing catalytic converter can cause the engine warning light to illuminate. This is a more serious issue that requires professional attention to prevent further damage to the vehicle’s emission system.
5. Engine Misfire: If the engine is misfiring, it means that one or more cylinders are not functioning properly. This could be due to spark plug or fuel injector issues. Professional diagnosis is recommended to pinpoint the exact cause.
Recommended Actions
When the engine warning light comes on, it is important not to ignore it. Even if the car seems to be running fine, there may still be an underlying issue that needs attention. Here are the recommended steps to take:
1. Check for Loose Gas Cap: Start by checking the gas cap and ensuring it is properly tightened. If the light remains on after tightening the cap, move on to the next steps.
2. Inspect for Visible Issues: Check for any visible signs of damage or loose connections in the engine compartment. However, keep in mind that many potential problems cannot be detected visually.
3. Use an OBD-II Scanner: An OBD-II scanner is a tool that can read the diagnostic trouble codes stored in your Mini Cooper’s engine control unit (ECU). Plug the scanner into the OBD-II port, usually located under the dashboard, and retrieve the codes.
4. Interpret the Trouble Codes: Each trouble code corresponds to a specific issue. Look up the code in your Mini Cooper’s service manual or consult online resources to understand the potential problem.
5. Decide on DIY or Professional Help: Depending on the severity of the issue and your mechanical skills, you can decide whether to address the problem yourself or seek professional assistance. Keep in mind that some issues may require specialized tools and expertise.
6. Address the Issue: Once you have identified the problem, take the necessary steps to address it. This may involve replacing a faulty sensor, repairing a damaged component, or seeking professional repairs.
Mini Cooper Warning Lights: Battery Warning Light

The battery warning light, shaped like a battery symbol, indicates a problem with the charging system of your Mini Cooper.
When this light comes on, it typically means that the battery is not receiving sufficient charge from the alternator. Ignoring this warning can lead to a drained battery and potential breakdowns.
Possible Causes
1. Failing Alternator: The alternator is responsible for charging the battery while the engine is running. A failing alternator can result in insufficient charge, triggering the battery warning light.
2. Weak Battery: If the battery is old or nearing the end of its lifespan, it may not hold a charge properly. This can cause the battery warning light to illuminate.
3. Loose or Corroded Battery Connections: Loose or corroded battery terminals can disrupt the flow of electricity, causing charging issues and triggering the warning light.
4. Faulty Voltage Regulator: The voltage regulator regulates the output of the alternator. A faulty regulator can lead to overcharging or undercharging of the battery, causing the light to come on.
5. Broken Serpentine Belt: The serpentine belt connects various engine components, including the alternator. If the belt breaks or becomes loose, the alternator may not spin properly, resulting in insufficient charging.
Recommended Actions
When the battery warning light illuminates, it is important to take immediate action to prevent battery failure and potential breakdowns. Here are the recommended steps to address the issue:
1. Check Battery Connections: Start by inspecting the battery terminals for any looseness or corrosion. If necessary, clean the terminals and tighten them securely.
2. Test the Battery: Use a multimeter or take your Mini Cooper to an auto parts store for a battery test. This will help determine if the battery is holding a charge properly. If the battery is weak or near the end of its lifespan, consider replacing it.
3. Inspect the Alternator: If the battery tests fine, the next step is to inspect the alternator. Check for any visible signs of damage or loose connections. If everything appears to be in order, move on to the next steps.
4. Check the Serpentine Belt: Inspect the serpentine belt for any signs of wear, damage, or looseness. If the belt is broken or worn, it may need to be replaced. Consult your Mini Cooper’s service manual for specific instructions.
5. Use a Multimeter: If you have a multimeter, you can perform a simple test to check the alternator’s output. With the engine running, connect the multimeter to the battery terminals and check for a voltage reading between 13.5 and 15 volts. Anything significantly lower may indicate a faulty alternator.
6. Seek Professional Help: If you are unable to diagnose or address the issue yourself, it is recommended to seek professional assistance. A qualified mechanic will have the expertise and tools to diagnose and repair the charging system effectively.
Mini Cooper Warning Lights: ABS Warning Light
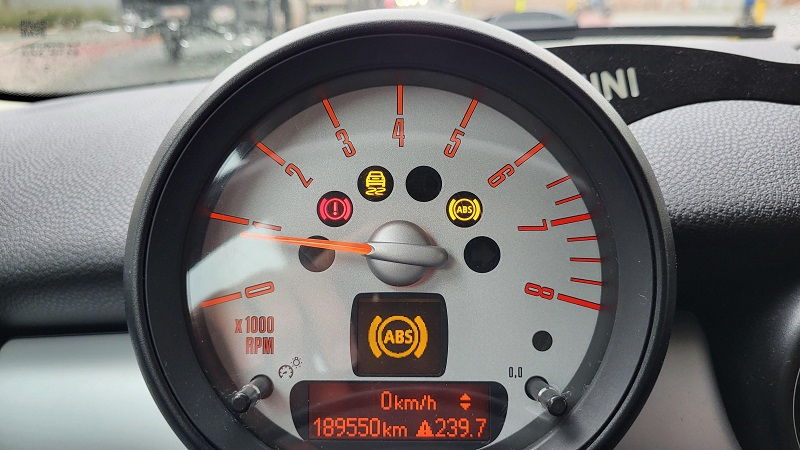
The ABS (Anti-lock Braking System) warning light in your Mini Cooper indicates a problem with the ABS system. When this light comes on, it means that the system may not function properly, potentially compromising your ability to brake safely. It is important to address this warning promptly to ensure optimal braking performance.
Possible Causes
See Also: P0441 Bmw X5: Fixing P0441 Error In BMW X5
1. Malfunctioning Wheel Speed Sensor: The ABS system relies on wheel speed sensors to detect individual wheel speeds. If one or more sensors fail or become damaged, it can lead to the ABS warning light illuminating.
2. Low Brake Fluid: The ABS system requires an adequate amount of brake fluid to function properly. If the brake fluid level is low, it may trigger the ABS warning light.
3. Faulty ABS Module: The ABS module is responsible for controlling the ABS system. If the module malfunctions, it can cause the warning light to come on.
4. Wiring Issues: Damaged or corroded wiring in the ABS system can disrupt the communication between the various components, leading to the ABS warning light illuminating.
5. ABS Pump Failure: The ABS pump is responsible for applying and releasing brake pressure as needed. If the pump fails, it can trigger the ABS warning light.
Recommended Actions
Check out this Chemical Guys BUF_503X TORQX Random Orbital Polisher, Pads, Polishes & Compounds Kit – 9 Items

When the ABS warning light comes on, it is crucial to take appropriate action to ensure your safety on the road. Here are the recommended steps to address the issue:
1. Check Brake Fluid Level: Start by checking the brake fluid level in the reservoir. If it is low, add the appropriate type of brake fluid recommended by your Mini Cooper’s manufacturer. Be cautious not to overfill.
2. Inspect for Visible Issues: Visually inspect the ABS system components, including the wheel speed sensors and wiring connections, for any visible signs of damage, loose connections, or corrosion. If any issues are detected, they may need to be repaired or replaced.
3. Perform a Wheel Speed Sensor Test: Using a diagnostic tool, you can perform a wheel speed sensor test to determine if any of the sensors are malfunctioning. This will help identify the specific sensor(s) causing the issue.
4. Check ABS Fuse: Check the ABS fuse to ensure it is intact. If the fuse is blown, it may need to be replaced. Consult your Mini Cooper’s service manual for the location of the ABS fuse.
5. Seek Professional Diagnosis: If the above steps do not resolve theissue or if you are unsure about how to proceed, it is recommended to seek professional diagnosis and repair. A qualified mechanic will have the necessary tools and expertise to accurately identify the root cause of the ABS warning light and perform the appropriate repairs.
Mini Cooper Warning Lights: Airbag Warning Light
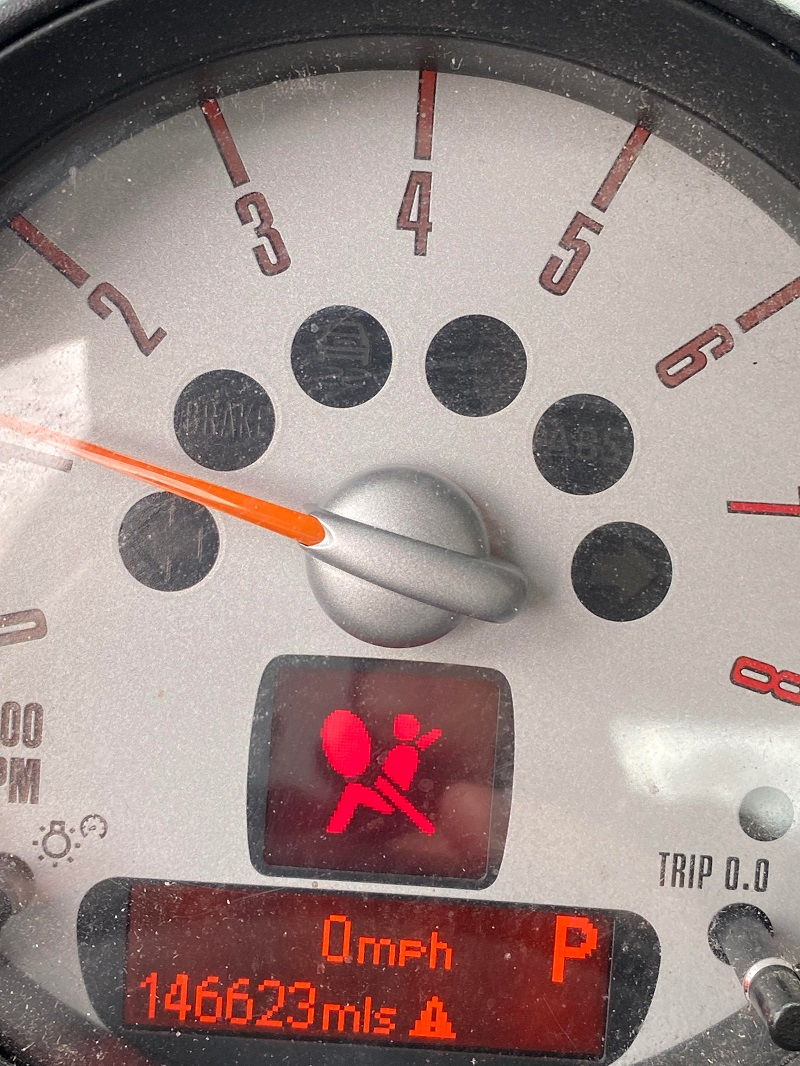
The airbag warning light in your Mini Cooper is a crucial safety indicator. When this light comes on, it means that there may be an issue with the airbag system. It is important to address this warning promptly, as a malfunctioning airbag system can compromise your safety in the event of a collision.
Possible Causes
1. Faulty Sensor: The airbag system relies on sensors throughout the vehicle to detect impacts and deploy the airbags when necessary. If one or more sensors fail or become damaged, it can trigger the airbag warning light.
2. Wiring Issues: Damaged or corroded wiring in the airbag system can disrupt the communication between the various components, leading to the airbag warning light illuminating.
3. Faulty Airbag Control Module: The airbag control module is responsible for monitoring the airbag system and deploying the airbags in the event of a collision. If the module malfunctions, it can cause the warning light to come on.
4. Recent Collision or Impact: If your Mini Cooper has recently been involved in a collision or impact, it is possible that the airbag system was triggered and needs to be reset or repaired. This can also cause the airbag warning light to illuminate.
Recommended Actions
When the airbag warning light comes on, it is crucial to take immediate action to ensure your safety. Here are the recommended steps to address the issue:
1. Check for Recent Collisions or Impacts: If your Mini Cooper has been involved in a collision or impact, it is important to have the airbag system inspected and reset by a qualified professional. They will be able to determine if any repairs or replacements are necessary.
2. Inspect for Visible Issues: Visually inspect the airbag system components, including the sensors and wiring connections, for any visible signs of damage, loose connections, or corrosion. If any issues are detected, they may need to be repaired or replaced.
3. Use a Diagnostic Tool: A diagnostic tool can be used to retrieve the diagnostic trouble codes stored in the airbag control module. These codes will provide valuable information about the specific issue causing the warning light to come on.
4. Seek Professional Assistance: Due to the complexity and sensitivity of the airbag system, it is recommended to seek professional assistance for diagnosis and repair. A qualified mechanic will have the necessary knowledge and equipment to accurately diagnose the issue and perform the appropriate repairs.
Mini Cooper Warning Lights: Tire Pressure Warning Light
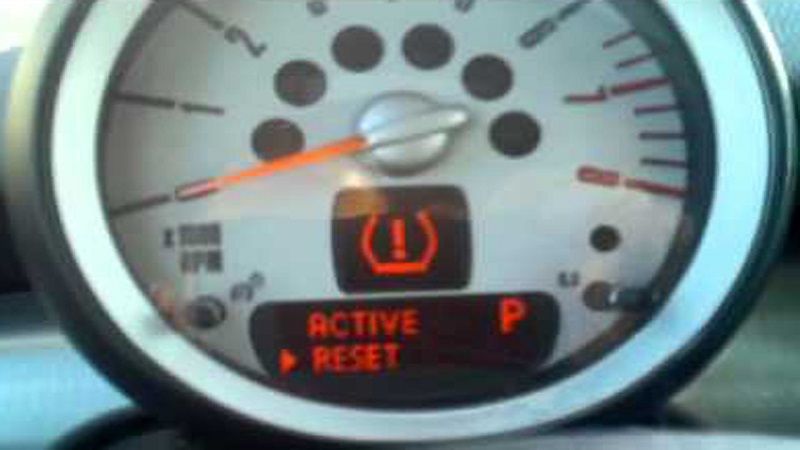
The tire pressure warning light in your Mini Cooper is designed to alert you when the tire pressure drops below the recommended level.
Proper tire pressure is essential for safe and efficient driving, and ignoring this warning can lead to decreased fuel efficiency, tire damage, and compromised handling.
Possible Causes
1. Changes in Temperature: Temperature fluctuations can cause the air inside the tires to expand or contract, leading to changes in tire pressure. This can trigger the tire pressure warning light.
2. Punctured Tire: A puncture or small leak in one of the tires can cause gradual pressure loss, leading to the warning light coming on.
3. Faulty Tire Pressure Monitoring System (TPMS) Sensor: The TPMS sensors are responsible for monitoring tire pressure and sending signals to the vehicle’s computer system. If one or more sensors fail or become damaged, it can cause the warning light to illuminate.
4. Incorrect Tire Pressure: If the tire pressure is significantly lower or higher than the recommended level, it can trigger the warning light.
Recommended Actions
When the tire pressure warning light comes on, it is important to address the issue promptly to ensure optimal tire performance and safety. Here are the recommended steps to take:
1. Check Tire Pressure: Start by checking the tire pressure in all four tires, including the spare tire if applicable. Use a tire pressure gauge to measure the pressure and compare it to the recommended level specified in your Mini Cooper’s owner’s manual or on the driver’s side door jamb.
2. Adjust Tire Pressure: If any of the tires have low pressure, use an air compressor to inflate them to the recommended level. If a tire is overinflated, use a pressure gauge or release air until it reaches the correct pressure.
3. Inspect Tires for Damage: Visually inspect all four tires for any signs of damage, such as punctures, cuts, or bulges. If any damage is detected, the tire may need to be repaired or replaced.
4. Reset the TPMS System: In some cases, the tire pressure warning light may need to be reset after adjusting the tire pressure. Consult your Mini Cooper’s owner’s manual for specific instructions on how to reset the TPMS system.
5. Check TPMS Sensors: If the warning light remains on even after adjusting the tire pressure and resetting the system, it is possible that one or more TPMS sensors are faulty. A qualified mechanic can diagnose and replace the faulty sensor(s) if necessary.
6. Regularly Monitor Tire Pressure: To prevent the tire pressure warning light from coming on in the future, make it a habit to regularly check and maintain the tire pressure according to the recommended levels. This will help ensure optimal tire performance, fuel efficiency, and safety.
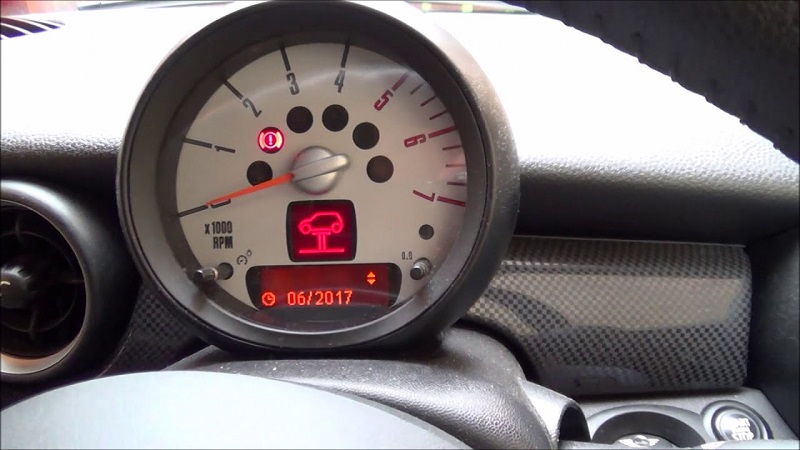
Mini Cooper Warning Lights: Oil Pressure Warning Light
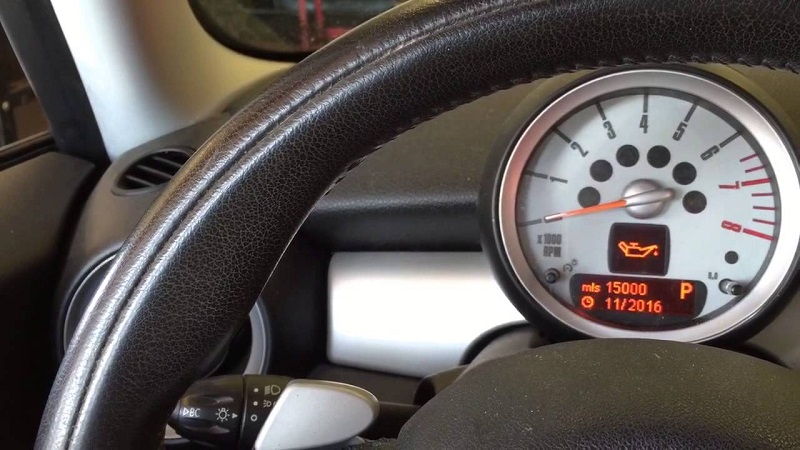
The oil pressure warning light in your Mini Cooper is a crucial indicator of the engine’s oil pressure. When this light comes on, it means that the oil pressure is too low, which can lead to engine damage if not addressed promptly. Ignoring this warning can result in engine overheating, increased friction, and potential engine failure.
Possible Causes
See Also: P0441 Bmw E39: Causes Of P0441 Code In BMW E39
1. Low Oil Level: A low oil level can cause the oil pressure to drop, triggering the warning light. This can be due to a leak, excessive oil consumption, or neglecting regular oil changes.
2. Faulty Oil Pressure Sensor: The oil pressure sensor is responsible for monitoring the oil pressure and sending signals to the vehicle’s computer system. If the sensor fails or becomes damaged, it may cause the warning light to illuminate.
3. Oil Pump Malfunction: The oil pump is responsible for circulating oil throughout the engine. If the pump fails or becomes clogged, it can result in low oil pressure and trigger the warning light.
4. Engine Blockage: Blockages in the oil passages or a clogged oil filter can restrict the flow of oil, leading to low oil pressure and the warning light coming on.
5. Worn Engine Bearings: Over time, engine bearings can wear out, causing a drop in oil pressure. This is typically a result of prolonged use or insufficient lubrication.
Recommended Actions
When the oil pressure warning light comes on, it is essential to take immediate action to prevent engine damage. Here are the recommended steps to address the issue:
1. Stop the Vehicle Safely: If the oil pressure warning light comes on while driving, it is crucial to stop the vehicle safely as soon as possible. Continuing to drive with low oil pressure can result in severe engine damage.
2. Check the Oil Level: Once the vehicle is safely stopped, check the engine oil level using the dipstick. If the oil level is low, add the appropriate type and amount of oil recommended by your Mini Cooper’s manufacturer.
3. Inspect for Visible Issues: Visually inspect the engine for any signs of oil leaks, damage to the oil pan, or loose connections. If any issues are detected, they may need to be repaired or replaced.
4. Check the Oil Filter: If the oil filter is clogged or overdue for replacement, it can restrict oil flow and cause low oil pressure. Consider replacing the oil filter if necessary.
5. Use a Mechanical Oil Pressure Gauge: If you have access to a mechanical oil pressure gauge, you can use it to verify the actual oil pressure. This will help determine if the issue is with the sensor or the oil pressure itself.
6. Seek Professional Help: If the oil pressure warning light persists even after adding oil and checking for visible issues, it is recommended to seek professional assistance. A qualified mechanic will have the necessary tools and expertise to diagnose and repair the oil pressure issue effectively.
Mini Cooper Warning Lights: Temperature Warning Light
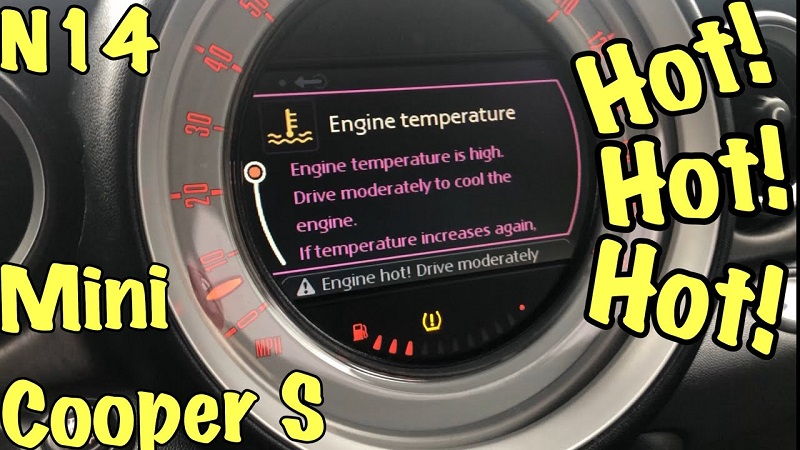
The temperature warning light in your Mini Cooper indicates that the engine temperature is too high. This warning is crucial, as overheating can cause severe engine damage and potential breakdowns. Ignoring this warning can result in warped cylinder heads, blown gaskets, and complete engine failure.
Possible Causes
1. Coolant Leak: A coolant leak can lead to a decrease in the coolant level, causing the engine to overheat. Common sources of coolant leaks include a damaged radiator, a faulty hose, or a leaking water pump.
2. Faulty Thermostat: The thermostat regulates the flow of coolant through the engine based on the temperature. If the thermostat fails, it can cause the engine to overheat by either restricting or allowing too much coolant flow.
3. Malfunctioning Cooling Fan: The cooling fan is responsible for drawing air through the radiator to cool the coolant. If the fan fails to operate properly, it can result in insufficient cooling and engine overheating.
4. Blocked Radiator: A blocked radiator, often due to debris or coolant sludge buildup, can restrict the flow of coolant and lead to engine overheating.
5. Failed Water Pump: The water pump circulates coolant throughout the engine. If the water pump fails, it can disrupt the coolant flow and cause the engine to overheat.
Recommended Actions
When the temperature warning light comes on, it is crucial to address the issue immediately to prevent engine damage. Here are the recommended steps to take:
1. Safely Pull Over: If the temperature warning light comes on while driving, safely pull over to the side of the road as soon as possible. Continuing to drive with an overheating engine can cause severe damage.
2. Let the Engine Cool Down: Once the vehicle is safely stopped, allow the engine to cool down before opening the hood. This will help prevent burns from hot components.
3. Check Coolant Level: Once the engine has cooled down, check the coolant level in the radiator or coolant reservoir. If the coolant level is low, add the appropriate type and amount of coolant recommended by your Mini Cooper’s manufacturer.
4. Inspect for Visible Issues: Visually inspect the engine for any signs of coolant leaks, such as puddles under the vehicle or visible wet spots on hoses or the radiator. If any issues are detected, they may need to be repaired or replaced.
5. Check the Thermostat: If the coolant level is sufficient and no visible leaks are present, the thermostat may be faulty. Consider having the thermostat inspected and replaced if necessary by a qualified mechanic.
6. Check the Cooling Fan: Ensure that the cooling fan is operating correctly. If it is not functioning, it may need to be repaired or replaced. Additionally, check the fan’s electrical connections and fuses.
7. Inspect the Radiator: Visually inspect the radiator for any signs of blockage, such as debris or coolant sludge buildup. If the radiator is blocked, it may need to be flushed or replaced.
8. Check the Water Pump: If all other components appear to be functioning correctly, the water pump may be the issue. A qualified mechanic can inspect the water pump and determine if it needs to be repaired or replaced.
9. Seek Professional Assistance: If the temperature warning light continues to illuminate or if you are unsure about how to proceed, it is recommended to seek professional assistance. A qualified mechanic will have the necessary tools and expertise to diagnose and repair the cooling system effectively.
Mini Cooper Warning Lights: Brake Warning Light
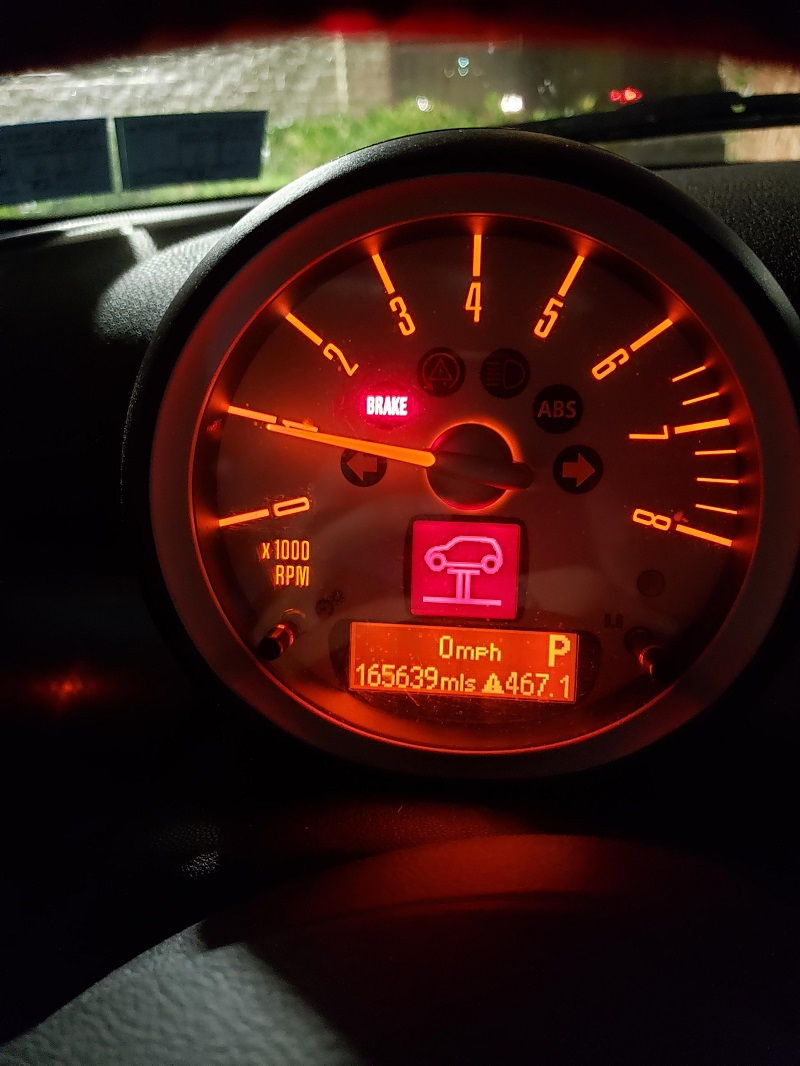
The brake warning light in your Mini Cooper indicates a problem with the braking system. When this light comes on, it is crucial to address the issue promptly to ensure safe braking performance. Ignoring this warning can lead to compromised braking ability, increased stopping distances, and potential accidents.
Possible Causes
See Also: P0441 Bmw E36: Importance Of Addressing P0441 Code
1. Worn Brake Pads: Brake pads wear down over time and need to be replaced periodically. If the brake pads are excessively worn, it can trigger the brake warning light.
2. Hydraulic System Issues: The brake hydraulic system consists of various components, including the master cylinder, brake lines, and calipers. Issues such as a leak, air in the system, or a faulty component can cause the warning light to illuminate.
3. Low Brake Fluid: The brake fluid level should be maintained within the recommended range. If the fluid level is low, it can indicate a leak or excessive brake pad wear.
4. Faulty Brake Light Switch: The brake light switch is responsible for illuminating the brake lights and triggering the brake warning light. If the switch fails, it can cause the warning light to come on.
5. ABS System Issues: The brake warning light may also be triggered if there is a problem with the ABS system, as it is interconnected with the braking system.
Recommended Actions
When the brake warning light comes on, it is important to address the issue promptly to ensure safe braking performance. Here are the recommended steps to take:
1. Check Brake Fluid Level: Start by checking the brake fluid level in the reservoir. If the level is low, it may indicate a leak or excessive brake pad wear. Consult your Mini Cooper’s owner’s manual for the appropriate type of brake fluid to use.
2. Inspect Brake Pads: Visually inspect the brake pads through the wheel spokes. If the pads appear to be excessively worn, they may need to be replaced. Consider having a qualified mechanic inspect the entire brake system for any other issues.
3. Check for Visible Leaks: Inspect the brake lines, calipers, and master cylinder for any visible signs of leaks, such as wet spots or dripping fluid. If any leaks are detected, the affected component should be repaired or replaced.
4. Bleed the Brakes: If there is air trapped in the brake system, it can affect braking performance and trigger the warning light. Bleeding the brakes will remove any air bubbles and ensure proper hydraulic pressure.
5. Inspect the Brake Light Switch: The brake light switch is typically located near the brake pedal. Check for any visible damage or loose connections. If the switch is faulty, it may need to be replaced.
6. Test the ABS System: The brake warning light may be interconnected with the ABS system. If the ABS warning light is also illuminated, it is recommended to have the ABS system inspected and repaired by a qualified mechanic.
7. Seek Professional Assistance: If the brake warning light remains on or if you are unsure about how to proceed, it is recommended to seek professional assistance. A qualified mechanic will have the necessary tools and expertise to diagnose and repair the braking system effectively.
Mini Cooper Warning Lights: Transmission Warning Light
The transmission warning light in your Mini Cooper indicates a problem with the transmission system. When this light comes on, it is important to address the issue promptly to prevent further damage to the transmission. Ignoring this warning can result in transmission failure, costly repairs, and potential breakdowns.
Possible Causes
1. Low Transmission Fluid: Low transmission fluid levels can cause the transmission to overheat and malfunction. This can result from a leak or insufficient fluid maintenance.
2. Faulty Transmission Sensors: The transmission system relies on various sensors to monitor gear selection, fluid pressure, and other critical parameters. If one or more sensors fail or become damaged, it can trigger the transmission warning light.
3. Damaged Transmission Solenoid: The transmission solenoid is responsible for controlling the flow of transmission fluid. If the solenoid becomes damaged or fails, it can lead to transmission issues and trigger the warning light.
4. Clutch or Gearbox Problems: Issues with the clutch or gearbox, such as worn components or improper adjustment, can cause the transmission warning light to come on.
5. Electrical or Wiring Issues: Damaged or corroded wiring in the transmission system can disrupt communication between the various components, leading to the warning light illuminating.
Recommended Actions
When the transmission warning light comes on, it is important to address the issue promptly to avoid further damage to the transmission. Here are the recommended steps to take:
1. Check Transmission Fluid Level: Start by checking the transmission fluid level using the dipstick. If the level is low, add the appropriate type and amount of fluid recommended by your Mini Cooper’s manufacturer. Be cautious not to overfill.
2. Inspect for Visible Leaks: Visually inspect the transmission and surrounding components for any signs of fluid leaks, such as wet spots or dripping fluid. If any leaks are detected, the affected component should be repaired or replaced.
3. Test Transmission Sensors: Using diagnostic tools, test the transmission sensors to ensure they are functioning correctly. If any sensors are found to be faulty, they may need to be replaced.
4. Check Transmission Solenoid: Inspect the transmission solenoid for any signs of damage or wear. If the solenoid is deemed faulty, it may need to be repaired or replaced by a qualified mechanic.
5. Inspect Clutch and Gearbox: If the transmission warning light persists, it is recommended to have the clutch and gearbox inspected by a qualified mechanic. They will be able to identify any issues and perform the necessary repairs or adjustments.
6. Check Electrical Connections: Inspect the electrical connections and wiring in the transmission system for any visible damage or corrosion. If any issues are detected, they may need to be repaired or replaced.
7. Seek Professional Assistance: If the transmission warning light remains on or if you are unsure about how to proceed, it is recommended to seek professional assistance. A qualified mechanic will have the necessary tools and expertise to diagnose and repair the transmission system effectively.
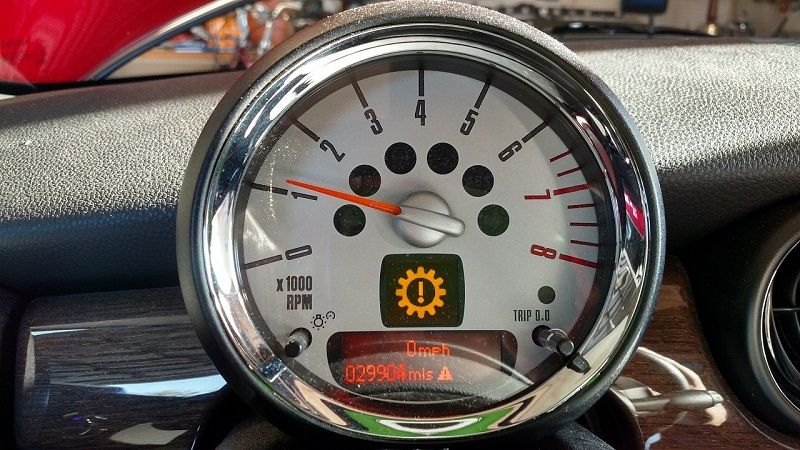
Mini Cooper Warning Lights: Service Due Warning Light
The service due warning light in your Mini Cooper serves as a reminder for regular maintenance. When this light comes on, it indicates that certain scheduled maintenance tasks are due, such as an oil change, filter replacement, or inspection. Adhering to the recommended maintenance schedule will help keep your Mini Cooperrunning smoothly and prevent potential issues in the long run.
Recommended Maintenance Tasks
The specific maintenance tasks indicated by the service due warning light will vary based on factors such as mileage, time since the last service, and the specific model of your Mini Cooper. Here are some common maintenance tasks that may be required:
1. Oil Change: Regular oil changes are essential for keeping the engine properly lubricated and preventing premature wear. Follow the recommended oil change intervals specified in your Mini Cooper’s owner’s manual.
2. Filter Replacement: The air filter, cabin air filter, fuel filter, and other filters in your Mini Cooper should be replaced at regular intervals to ensure proper air and fuel flow.
3. Fluid Checks and Replacements: Regularly check and replace fluids such as coolant, brake fluid, power steering fluid, and transmission fluid as per the manufacturer’s recommendations.
4. Tire Rotation and Alignment: Tire rotation helps ensure even tire wear, while regular wheel alignment ensures optimal handling and extends tire life. Follow the recommended intervals for tire rotation and alignment.
5. Brake Inspection: Regular brake inspections help identify worn brake pads, damaged rotors, or other potential issues. Have the brakes checked at recommended intervals or if you notice any abnormal brake performance.
6. Battery Maintenance: Check the battery terminals for corrosion and ensure they are securely connected. Clean any corrosion and consider having the battery tested to ensure it is holding a charge properly.
7. Spark Plug Replacement: Over time, spark plugs can become worn or fouled, affecting engine performance. Replace spark plugs as recommended by your Mini Cooper’s manufacturer.
8. Timing Belt or Chain Replacement: If your Mini Cooper is equipped with a timing belt or chain, it may need to be replaced at specific mileage intervals to prevent potential engine damage.
Recommended Actions
See Also: BMW Dashboard Warning Lights Triangle
When the service due warning light comes on, it is important to schedule the necessary maintenance tasks promptly. Here are the recommended steps to take:
1. Consult the Owner’s Manual: Refer to your Mini Cooper’s owner’s manual to determine the specific maintenance tasks required and the recommended intervals for each task.
2. Schedule Maintenance: Based on the information provided in the owner’s manual, schedule an appointment with a trusted mechanic or Mini Cooper dealership to have the required maintenance tasks performed.
3. Communicate with the Mechanic: When scheduling the appointment, communicate any specific concerns or issues you may have noticed with your Mini Cooper. This will help the mechanic address them during the maintenance service.
4. Follow the Recommended Intervals: Moving forward, make it a habit to follow the recommended maintenance intervals for your Mini Cooper. Regular maintenance will help keep your vehicle in optimal condition and prevent potential issues.
5. Keep Records: Keep a record of all the maintenance tasks performed on your Mini Cooper, including the dates, mileage, and specific services performed. This will help track the vehicle’s maintenance history and provide valuable information for future maintenance needs.
By adhering to the recommended maintenance schedule indicated by the service due warning light, you can ensure that your Mini Cooper continues to perform at its best and enjoy a reliable driving experience for years to come.
In conclusion, being aware of Mini Cooper warning lights is essential for maintaining your vehicle’s performance and safety. By understanding the meaning behind each warning light and taking appropriate action, you can address potential issues promptly, preventing further damage. Remember to consult your Mini Cooper owner’s manual and seek professional assistance if necessary. Stay vigilant and enjoy your Mini Cooper’s exhilarating driving experience!
Related video of Understanding Mini Cooper Warning Lights: A Comprehensive Guide

- Used Trucks for Sale in Texas Under 10000 With Warranty - June 19, 2026
- Used Trucks for Sale in Texas Under 5000 Good Condition - June 18, 2026
- Used Trucks for Sale in Texas Under 5000 No Credit Check - June 17, 2026